
I’ve brewed hundreds of pots on classic Bialettis and modern stovetops, testing different coffees, grinders, and heat levels to dial in consistent, rich results. If you’re wondering What grind size should I use for a Moka Pot?, here’s the quick answer: use a medium-fine grind, slightly finer than drip but coarser than espresso. In this guide, I’ll show you exactly how to nail that sweet spot, avoid bitter or sour cups, and get café-quality moka at home without guesswork.

Source: batchcoffee.co.uk
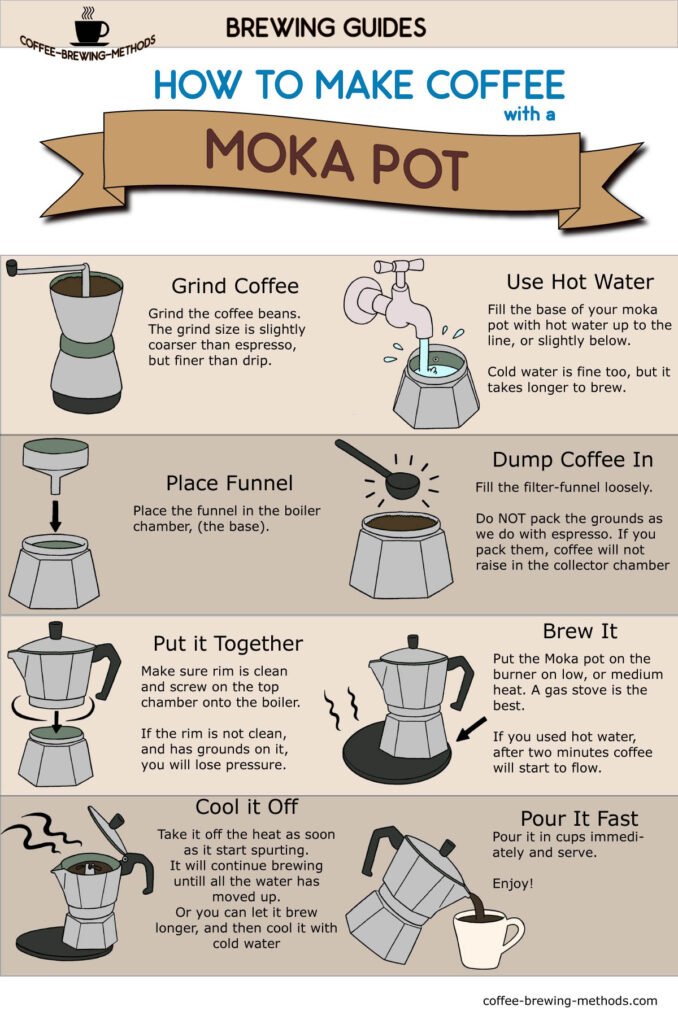
What Is The Best Grind Size For A Moka Pot?
The best grind for a Moka Pot is medium-fine. Think table salt or slightly finer. It should be:
– Finer than pour-over or standard drip
– Coarser than espresso
– Consistent, with minimal dust (fines)
If you like specifics, many pros target an average particle size roughly around 400 to 600 microns. That’s a guideline, not a rule—your grinder and beans will shift this a bit.
What this gives you:
- Balanced extraction without choking the pot
- Good body and sweetness with mild clarity
- Faster, more reliable brews on a normal kitchen stovetop
My real-world tip: on most consumer burr grinders, this translates to a setting a couple of clicks finer than drip and several clicks coarser than espresso. If your grind is too fine, the moka sputters late, tastes bitter, and may scorch. Too coarse, and it rushes through, tasting thin and sour.

Source: www.reddit.com
How Grind Size Affects Extraction And Pressure
A Moka Pot works by heating water in the lower chamber to create steam pressure that pushes water up through the coffee bed. Grind size controls how easily water passes:
– Too fine: High resistance. The pot overheats waiting to push water through, leading to bitterness, harshness, and potential safety issues.
– Too coarse: Low resistance. Water flies through under-extracted, giving a sour, weak cup.
– Just right (medium-fine): Balanced flow, steady burble, and a rounded, chocolatey profile.
Taste checkpoints I rely on:
- Sour or grassy taste: go finer, or lower the heat slightly.
- Bitter, ashy, or dry finish: go coarser, or remove from heat earlier.
- Hollow or watery: slightly finer and ensure you’re filling the basket properly.

Source: europeancoffeetrip.com
How To Dial In Your Grind: Step-By-Step
Use this simple workflow to lock in your moka grind in 2 to 3 brews.
Step 1: Prep
- Fill the bottom chamber with hot water up to the safety valve.
- Fill the basket level with coffee. Do not tamp. Lightly level with a finger or tap the side once.
Step 2: Start With Medium-Fine
- Set your grinder just a touch finer than drip.
Step 3: Heat Management
- Assemble carefully, use medium heat, lid open.
- When coffee starts to flow in a steady, honey-like stream, watch the color.
Step 4: Pull Early
- As the stream turns blond and begins to sputter, remove from heat immediately and close the lid. You can cool the base under a trickle of cold water to stop extraction.
Step 5: Taste And Adjust
- Too bitter and thick: coarsen 1 to 2 clicks.
- Too thin and sour: fine up 1 to 2 clicks.
- Gurgling violently or stalling: coarsen and lower heat next time.
Personal note: I like a quick swirl of the top chamber to homogenize the brew for consistent flavor across cups.
Source: www.reddit.com
Grinder Recommendations And Settings
A consistent burr grinder matters more than the brand. Blade grinders create too many fines that can clog moka.
Good options:
- Manual burr grinders: Excellent control and budget-friendly. Look for models with stepped settings so you can track changes.
- Electric burr grinders: Convenient and consistent. Mid-range machines with steel burrs are great for moka.
Typical starting points:
- If your grinder has “espresso” to “pour-over” range, start around the midpoint leaning toward the espresso side.
- For stepped grinders, go 2 to 4 steps finer than your drip setting.
- For micro-stepped grinders, adjust in very small increments. Tiny changes make big flavor differences in moka.
Maintenance tip: Clean your burrs regularly to prevent oil build-up, which can cause uneven grind and stale flavors.
Beans, Roast Level, And Freshness
Different beans and roasts prefer slightly different grind sizes.
- Light roasts: Usually benefit from a touch finer grind and slightly hotter start to extract sweetness and acidity balance.
- Medium roasts: The moka sweet spot. Medium-fine with standard heat yields chocolate, caramel, and nutty profiles.
- Dark roasts: Go a hair coarser to reduce bitterness and astringency, and keep the heat moderate.
Freshness matters:
- Use beans within 2 to 4 weeks of roast for best results.
- If beans are very fresh and degassing, you may need to go a bit coarser to maintain flow.
- Store beans airtight, away from light and heat. Grind just before brewing.
Water, Heat, And Basket Prep Best Practices
Small technique tweaks massively improve moka consistency.
Water
- Use filtered water if your tap is hard or tastes off.
- Start with hot water in the bottom chamber to shorten time on heat and reduce bitterness.
Basket Prep
- Fill to level, no tamping. A gentle level with your finger is enough.
- Keep the filter and gasket clean and seated properly.
Heat Control
- Use medium heat. The goal is a steady, soft burble, not a roar.
- Keep the lid open to monitor the stream, then close once you pull it off heat.
- If you see spitting or violent sputtering, the heat is too high or the grind too fine.
Yield and Ratio
- Most moka pots are designed for a fixed dose. Don’t underfill the basket.
- If you want a longer cup, add hot water to the finished brew rather than over-extracting on the stove.
Common Problems And Fixes
Bitter, ashy, or burnt
– Cause: Too fine, too hot, or too long on heat.
– Fix: Coarsen slightly, use hot start, remove from heat earlier, or cool the base.
Sour, thin, or weak
- Cause: Too coarse or too cool.
- Fix: Grind finer, ensure hot start, confirm you filled the basket level.
Stalling or no flow
- Cause: Grind too fine, over-tamped, dirty gasket/filter, or overfilled water chamber.
- Fix: Coarsen grind, never tamp, clean parts, fill below the safety valve.
Gushing or channeling
- Cause: Uneven grind or distribution.
- Fix: Use a quality burr grinder, gently level the bed, avoid shaking aggressively.
Metallic taste
- Cause: New pot not seasoned or mineral-heavy water.
- Fix: Run a few cycles with coffee you don’t mind discarding; use filtered water.
Cleaning, Maintenance, And Safety
Good care keeps flavors clean and equipment safe.
- Rinse and dry all parts after each brew. Avoid soap if your pot is aluminum; mild soap is fine for stainless steel.
- Replace the gasket and screen periodically; a worn gasket causes leaks and poor pressure.
- Never cover the safety valve or fill water above it.
- Don’t leave the pot unattended on high heat.
- Store the pot disassembled so moisture doesn’t linger and cause odors.
Frequently Asked Questions Of What Grind Size Should I Use For A Moka Pot?
Is Moka Pot Grind The Same As Espresso?
No. Espresso is typically finer. For moka, go coarser than espresso to avoid stalling and bitterness.
Can I Use Pre-Ground Coffee?
You can, but results vary. Many pre-ground coffees are either too fine or too coarse. If buying pre-ground, ask for medium-fine for moka or stovetop espresso.
Should I Tamp Moka Pot Coffee?
No. Level the grounds without applying pressure. Tamping restricts flow and can cause bitterness or safety issues.
Why Is My Moka Pot Coffee Bitter?
Likely too fine a grind, too much heat, or leaving the pot on heat after blonding. Coarsen slightly and pull it off heat earlier.
How Much Coffee Should I Use?
Fill the basket level to the rim without tamping. Moka pots are designed for a fixed dose; underfilling can cause weak, sour results.
Do I Need To Start With Hot Water?
It’s optional but recommended. Hot water shortens the time on the stove, reducing the chance of over-extraction and bitterness.
Final Thoughts And Your Next Brew
Medium-fine is the sweet spot for moka: just finer than drip, looser than espresso. Combine that grind with a hot water start, level basket, and gentle heat, and you’ll get a rich, chocolatey stovetop brew that’s easy to repeat. Start with the baseline here, make small grind tweaks, and taste your way to your perfect cup.
Ready to upgrade your moka game? Try the step-by-step dial-in method on your next brew, then share your results or questions in the comments. If you found this helpful, subscribe for more practical coffee guides and grinder tips.
Watch This Video on What grind size should I use for a Moka Pot?