I’ve brewed thousands of cups behind café bars and at home, and one small step consistently separates a flat cup from a vibrant one: the coffee bloom. Put simply, the coffee bloom is the rapid release of trapped CO2 when hot water first hits freshly ground coffee. Understanding and controlling this bloom can dramatically improve flavor, extraction, and consistency. In this article, I’ll break down what a coffee bloom is, why it matters, how to do it right across brew methods, and how to troubleshoot common issues. If you’ve ever wondered why your pour-over sings some days and slumps on others, this is the key you’ve been missing.
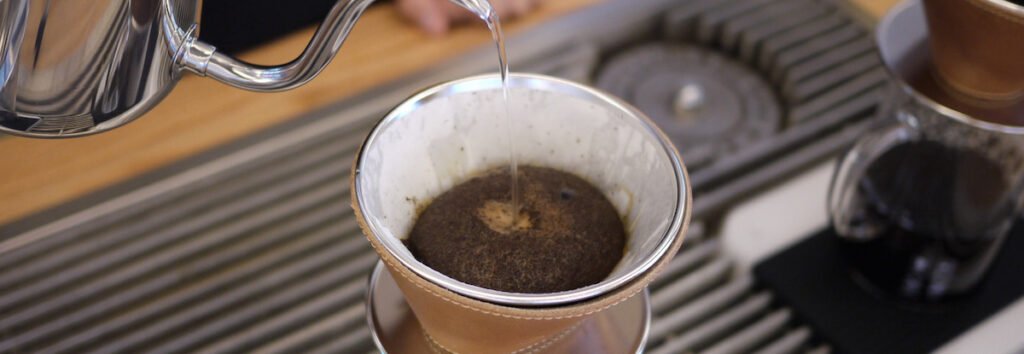
When coffee is roasted, CO2 builds up inside the beans. After grinding, that gas is eager to escape. When hot water touches the grounds, CO2 rapidly releases, expanding and creating a dome-like foam called the bloom. This visible bloom is a sign of freshness and active degassing.
Here’s what’s happening:
CO2 release: Fresh coffee contains more dissolved CO2, which repels water from the grinds at first contact.
Wetting and swelling: As gas escapes, water penetrates the grounds more evenly, allowing better extraction later.
Aromatic release: Volatile compounds are carried upward with the gas, giving that intoxicating aroma in the first seconds.
From a brewing perspective, blooming is about controlling gas to improve water flow and extraction uniformity. If you skip it, CO2 can create micro-channels and uneven extraction, leading to sour or hollow flavors.
I first learned this the hard way: my early pour-overs tasted sharp and thin until I started giving the grounds a proper 30–45 second bloom. The difference was immediate—more sweetness, rounder body, cleaner finish.
Why Coffee Bloom Matters For Flavor And Extraction
Blooming isn’t just a nice ritual—it solves real extraction problems.
Reduces channeling: Gas pockets push water away. A bloom vents CO2 so water can saturate the bed evenly.
Stabilizes extraction: With the gas gone, flow becomes predictable. You get more consistent results from cup to cup.
Improves flavor balance: Proper blooming mitigates under-extraction (sourness, sharp acidity) and unlocks sweetness and complexity.
Indicates freshness: A vigorous bloom typically signals recent roasting. A flat surface can hint at staling or improper storage.
Studies on coffee degassing show that CO2 release is highest in the first days after roasting and can persist for weeks, depending on roast level and storage. In practice, I’ve found bloom vigor correlates with roast date and storage quality—strong bloom within 7–21 days post-roast is common, while minimal bloom often predicts muted flavor.
What Affects The Coffee Bloom: Freshness, Roast, Grind, And Water
Several variables dictate how dramatic your bloom will be and how long it should last.
Freshness and roast date: Fresher beans (within 2–4 weeks of roasting) typically bloom more. Extremely fresh beans (1–3 days) can be overly gassy and tricky to control.
Roast level: Darker roasts degas more quickly and can show a big bloom early, then fade. Lighter roasts retain CO2 longer, often needing a longer bloom phase.
Grind size: Finer grinds trap more gas and require careful blooming to avoid channeling. Coarser grinds release gas faster.
Water temperature: Hotter water (195–205°F or 90–96°C) accelerates degassing. Too cool and the bloom can be sluggish; too hot and you may extract harshness.
Dose and bed depth: A deeper bed traps more gas. Larger doses often need a slightly longer bloom or a second short pulse.
Processing method: Natural and honey-processed coffees sometimes bloom differently than washed coffees due to residual compounds impacting gas release and wetting.
Practical ranges I rely on:
Bloom time: 30–60 seconds for most pour-overs; 20–45 seconds for immersion methods.
Bloom water volume: About 2–3 times the dry coffee weight for pour-over (e.g., 30–45 g water for 15 g coffee).
How To Bloom Coffee Correctly: Step-By-Step By Brew Method
Use these method-specific tips to control bloom and improve extraction.
Pour-Over (V60, Kalita, Origami)
– Grind: Medium to medium-fine.
– Dose example: 15 g coffee, 250 g total water.
– Bloom: 30–45 g water in 5–10 seconds, then wait 30–45 seconds.
– Tip: Gently swirl the brewer right after pouring to knock out trapped gas and ensure even wetting.
– Watch for: A domed surface that slowly flattens. Begin main pour when the surface settles.
French Press
– Grind: Medium-coarse.
– Bloom: Add just enough water to saturate grounds, stir, wait 30 seconds, then add the rest.
– Tip: Skim the top crust before plunging for a cleaner cup.
AeroPress
– Grind: Medium to medium-fine.
– Bloom: 30–40 g water for 20–30 seconds; stir to degas, then pour remaining water.
– Tip: Inverted method allows a longer bloom without dripping.
Automatic Drip Machine
– If your machine lacks a pre-infusion setting, manually bloom by pouring a small amount of hot water over the grounds before starting the machine.
– Alternatively, choose brewers with pre-wet cycles or use a switchable kettle to pre-bloom in the basket.
Espresso (Pre-Infusion)
– Espresso doesn’t “bloom” like pour-over, but pre-infusion serves a similar role: gently saturating the puck to reduce channeling.
– Try 2–5 seconds low-pressure pre-infusion (1–3 bar) before full pressure.
– Watch for early beading at the spouts and an even flow to confirm good puck saturation.
Personal note: On high-acidity light roasts, a slightly longer bloom or pre-infusion often softens sharp edges and brings out fruit sweetness. On dark roasts, I shorten the bloom to prevent over-extraction and bitterness.
Troubleshooting Bloom: Real-World Problems And Fixes
If your coffee bloom looks off, here’s what it might mean and how to recover.
No bloom or a flat surface
Likely causes: Stale coffee, very coarse grind, cool water, or under-dosing bloom water.
Fixes: Use fresher beans, heat water to 200°F/93°C, grind slightly finer, increase bloom volume to 2–3x coffee weight.
Aggressive mushroom cloud that collapses unevenly
Likely causes: Very fresh beans or too fine a grind creating gas pockets.
Fixes: Extend bloom by 15–20 seconds, swirl or stir gently, or coarsen grind slightly.
Sour, sharp cup after proper bloom
Likely causes: Under-extraction from too short brew time or too coarse a grind.
Fixes: Grind finer, extend total brew time, raise brew ratio slightly.
Bitter, hollow cup despite good bloom
Likely causes: Over-extraction or too hot water.
Fixes: Lower water temperature by 2–3°F, coarsen grind, shorten total contact time.
Uneven bed and channeling
Likely causes: Inconsistent pouring or uneven saturation during bloom.
Fixes: Use a controlled kettle, pour center-out in small circles, swirl to distribute water evenly.
Lesson learned: When I see a lopsided bloom, I immediately add a gentle swirl. It’s the quickest fix for even saturation without disturbing the bed too much.
You don’t need lab gear to benchmark your bloom. Here’s how I evaluate it:
Visual check
Look for a uniform dome that rises and settles within 30–60 seconds.
Watch for consistent bubbling across the surface (not just one side).
Timing
Measure bloom duration. Most home setups shine with a 30–45 second bloom for pour-over.
If your brew stalls after bloom, you likely trapped gas; add a swirl next time.
Weight-based bloom
Use a scale: dose 20 g coffee, bloom with 40–60 g water.
Note how quickly the surface settles. Adjust bloom volume based on roast level.
Comparative cupping
Brew two identical cups: one with a 10-second bloom, one with 45 seconds.
Taste side by side for sweetness, clarity, and balance. Most palates prefer the fuller bloom.
Log your variables
Record roast date, grind, water temp, bloom volume, bloom time, and taste notes. Patterns appear fast and guide repeatable success.
Frequently Asked Questions Of What Is A “Coffee Bloom” And Why Is It Important?
Does a bigger bloom always mean better coffee?
Not always. A big bloom usually indicates freshness, but extremely gassy beans can make extraction harder. Aim for a controlled bloom that settles within 30–60 seconds rather than chasing maximum height.
How long should I let coffee bloom?
For most pour-overs, 30–45 seconds is ideal. Light roasts may benefit from 45–60 seconds, while dark roasts often do well at 20–30 seconds to avoid over-extraction.
Can I bloom coffee in a French press or AeroPress?
Yes. Blooming improves immersion methods by releasing CO2 before full water contact, leading to more even extraction and better flavor.
What water temperature is best for blooming?
Start around 200°F/93°C. If you taste sharp acidity or see excessive fizzing, drop a couple of degrees. If the bloom looks sluggish, raise it slightly.
Is pre-infusion the same as blooming for espresso?
Functionally similar. Espresso doesn’t form a foamy bloom, but pre-infusion wets the puck gently, reducing channeling and enhancing consistency and flavor.
Why does my coffee not bloom at all?
It may be stale, ground too coarse, or brewed with water that’s too cool. Try fresher beans, a finer grind, and hotter water.
Do dark roasts need blooming?
Yes, but usually for less time. Dark roasts degas quickly, so a short 20–30 second bloom is often enough.
Conclusion
Mastering the coffee bloom is one of the fastest ways to upgrade your daily cup. By controlling CO2 release with a thoughtful 30–60 second pre-wet, you open the door to sweeter, clearer, and more consistent brews—whether you’re making pour-over, French press, or dialing in espresso pre-infusion. Start small: weigh your bloom water, time it, and add a gentle swirl. Then log your changes and taste your way toward your perfect cup.
Ready to take your brewing further? Try the bloom techniques above, share your results in the comments, and subscribe for more step-by-step coffee guides.
Watch This Video on What is a "coffee bloom" and why is it important?